Follow Me

Close

Today’s post comes to us from Robert Bell of VM Media, thanks for the great ideas Robert!


There are all sorts of home theaters in today’s day and age. When you decide to design a home theater for your family, there are some tips that you should follow to ensure that you get the best possible picture, sound and overall experience. You don’t want to forget anything as it may detract from the viewing process.

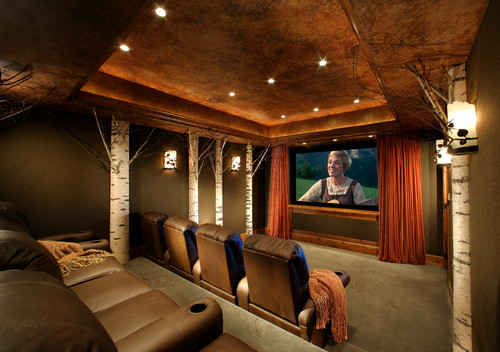
Choose your TV carefully.

Plan and Design the Perfect Home Theater for Your Family

Image via Tumblr

You may think that buying the enormous 80” TV that’s on sale at your local electronics store is the best deal. Once you put it into the space, however, it may be completely wrong. You don’t want to turn your head from side to side to see the whole movie. This isn’t a tennis match, it’s a movie. This means that you have to choose the TV based upon the size of the room.

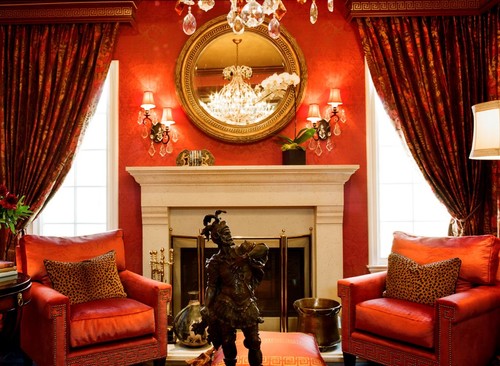
Control your Lighting.

Plan and Design the Perfect Home Theater for Your Family

Image via Pinterest


If you have windows or sliding doors in your home theater room, you are going to have to prepare them appropriately. Light is going to affect the way that the image is projected on the screen. You don’t have to make the room pitch dark. Even movie theaters have some indirect, dim lighting just to avoid eyestrain and so you don’t trip on your way to get more popcorn.

Focus on Sound.

Plan and Design the Perfect Home Theater for Your Family

Image via Home Theaters Dallas


As you shop for speakers, learn about what your amplifier is looking for. Ohms and wattage numbers are written on things for a reason. If you want your sound to be top notch, it has to be a good pairing. If the pairing is wrong, your amplifier could burn out or your speakers could be blown – and that’s a lot of money down the drain. Read the owner’s manual to protect yourself.

Hide the Wires.

Plan and Design the Perfect Home Theater for Your Family

Image via HTS

You are going to be in the home theater room often. If you have a lot of wire showing on the walls, it’s going to detract from the aesthetics. If the wire is draped across the floor, you also run the risk of someone tripping on it and taking the entire surround system with them. You can hide the wires with rugs, duct tape, and by bringing them through the walls. If the wires aren’t cooperating with you, consider hiring a professional. It will only cost a few hundred dollars and is nothing when you compare it with the other money you are spending.

Tiered-Seating.

Everyone in the room has to be able to see the screen well. If you want to have more than a few people come in, you want to look at tiered seating as it will help you to fit more people into the room. You don’t have to buy stadium seating. If you create multiple levels within the room using cement or wooden platforms, you can then put chairs or couches on them.

Get the Right Content

You have to consider how you are going to get content for your TV. Think about:

Streaming Video: YouTube, Hulu, and Netflix can all provide a huge amount of viewing options for your TV.  Many people have even eliminated cable all together as they find they get enough out of YouTube and Netflix. There are even rumors that YouTube might start streaming football games in the near future.

– Cable – This option is often the most traditional and many people still use cable combined with a DVR to get everything they want out of their TV.

– DirecTV – Currently DirecTV has the most advanced DVR on the market.  The DirecTV Genie not only records shows but it can also stream them on your iPhone, iPad, and laptop.  This makes for a great provider if you can’t always enjoy your shows in your home theater.  If you sign up using www.SaveonTVDirect.com you get special pricing and 3 free months of Showtime.

Some Other Things to Consider

When you design your home theater, try to pick a few features that are just like in the movie theaters. Love how they have lighting along the seating to help you see? You can buy rope lighting to run along the floor to get the same effect.

Want the snack bar? A movie-theater style popcorn machine can be outfitted into your home theater. It will pop a lot of popcorn at once and you can even get liquid butter to pump over top of it – just like you would get at the movie theater.

Don’t waste your money where it doesn’t need to be wasted. HDMI cables are going to be the same whether they are gold plated or not.

The perfect home theater should be perfect for your space and your family. The entire idea behind designing it should be that it fits your needs and your budget.


If you follow our blog regularly, then you know how fond we are of bringing the outdoors in when it comes to design.  There is nothing more rustic than the outdoors, nothing that says “lodge” more than the forest itself.  One of the most unique and striking ways to bring the outdoors into your home is by using actual trees.  Yes, you can ACTUALLY bring the forest inside your house.  While you can do this with all sorts of log furniture, flooring, beams, etc, one of the most unique ways that I have seen to do it is by using aspen trees.  Aspen trees are gorgeous, and also characteristic of the Rocky Mountains- they are a hallmark of the beautiful place that we call home, so why not make them a hallmark in your own home?  Here are some ingenious ways to use aspens when creating your own indoor forest:


Aspen Wall- Okay so this room doesn’t really look like it’s in the mountains, I don’t think you would be wanting to sit under a twig ceiling when the snow started falling!  But, I do love the use of aspens as a dividing wall in this space!

Aspen Beams | Home on the Range

Image via Pinterest


Aspen Beams- This may be the neatest thing I have ever seen!  I actually don’t know that I’ve ever seen anything similar to the aspen woodwork in this room.  The different shapes and textures of the aspen logs make for a beautiful and rugged looking space.

Aspen Beams | Home on the Range

Image via Pinterest


Aspen Bed- These full sized aspen trees (minus the leaves) add a rustic sense of depth and height to the room, while the chandelier helps keep it classy and remind you that you are in fact in a bedroom and not the woods.

The Aspen Theater- I can’t tell if these are real aspen trees or not- maybe they’re birch trees?  Maybe they’re fake trees?  Either way, they’re so creative!  Even tucked away into a room with no windows, there’s no forgetting that you’re in the mountains here!
Aspen Shelf-  I love the use of aspen trunks in these shelves.  Using furniture pieces made from aspens will help incorporate the look into your space without having to make it a focal point.
Aspen Tree Furniture | Home on the Range

Image via Pinterest


The Aspen Hall- Look at this one!  This might be one of my favorites!  Covering an entire wall in your home with aspen logs would be a bold step, but if you were willing to take the leap it would be a beautiful statement!

For more aspen, forest, log and twig ideas, visit us on Pinterest!  You can also like us on Facebook to have inspiration delivered straight to your wall!  For more information on design services, or to see our portfolios, take a look at our website!

We are seeing it more and more and more (I had to add a third “more” because we are seeing it so much): the economy has been hard on everyone in the last few years, so, rather than purchasing land and building brand new homes, people are choosing to remodel homes that are already there.  Some decide to remodel the house they’ve lived in for 20 years, and some are making the move to a different house that needs work.  Whichever category you fall into, there are a few VERY important things to ask yourself before you begin your remodel.  These are things that will not only help you decide what direction to go and begin to craft a plan, but will also help save you untold trouble down the road.  Isn’t that great?  So, without further ado, here are 5 things to consider before remodeling:

1.  Why am I remodeling?

This seems like a logical thing to ask yourself, so you may be surprised that you haven’t figured it out yet.  Take a little while to think about it- you can even write it down to look back at along the way.  Why are you choosing to remodel?

Did you just buy a new “fixer-upper” that is going to require lots of work to make it live-able?

Are you living in a home with outdated style, floorplan, appliances, finishes, furniture, etc?

Have you decided that putting in the time to change the home you live in now is a better option than moving?

Are you trying to add value to your home?

Have you decided that buying an existing home and remodeling is a better option than starting a new construction?

Once you have an answer to this question, you will be able to move forward in a more confident way, because you will be able to easily access your reasoning for remodeling in the first place, and keeping this answer handy will help you to answer other questions that are sure to come up during this process.


2.  Am I creating something that I can live with for the next 20+ years?

You may already have a picture in your head (or on your Pinterest boards) of exactly how you want your crisp new-to-you home to look when you first open that door.  It may or may not be trendy, but if you are remodeling for updating reasons, chances are that there are fad fashions somewhere in that vision.  Chevron?  Grays and greiges?  Stainless steel and granite?

5 things to consider before remodeling | Home on the Range

Image via ChicTip

While these things seem incredibly chic right now, try to remember how chic shag carpeting, floral wallpaper and brass fixtures were in their day.

5 things to consider before remodeling | Home on the Range

Image via Flickr

Wouldn’t it be a shame to put months of work into creating the most trendy house on the block, only to realize in 2015 that your house is no longer cool and you now have to wait until you have the time and money to remodel yet again?  Rather than focusing on what is hot at the moment, try to really think about your OWN style, what will work for your family, and what will be comfortable and timeless for years to come.

5 things to consider before remodeling | Home on the Range

Image via Home on the Range

Also think about the possibility of selling your house down the road, and what a prospective buyer might think of your updates.


3.  Am I able to do this myself?

What is the scope of what you are trying to accomplish?  It’s CRAZY how fast a few “DIY projects” can turn into chaos and get you in over your head.  While it’s fantastic to picture yourself re-tiling, staining cabinets, and color coordinating fabrics and furniture, the cold hard truth is that (unless you are some sort of home improvement prodigy) you will not likely accomplish all or any of your goals if you leave it completely up to yourself.

5 things to consider before remodeling | Home on the Range

Image via Besotted Cottage

You have other things to do, and we all know that home projects tend to fall by the wayside.  If you are reading this paragraph and thinking “hmmmmm that might be me,” it’s time to seriously consider outside help.  Strange as it may sound, interior designers are accessible to everyone.

5 things to consider before remodeling | Home on the Range

Image via Home on the Range

We can coordinate subcontractors, help you choose fabrics, colors, styles and finishes from an insanely overwhelming selection, and get to know you so well that we can personally handcraft your dream home for you.  And we can probably do it for less than you think.  Maybe not a lot less, but we have yet to have a single client who didn’t think the end product of our services was worth the money.  Better to pay more up front for someone who knows what they’re doing than to pay down the road because it wasn’t done right the first time!

4.  What does my budget allow?

This question really follows from the previous question, and this is where, at the very minimum, a consultation with a professional is key.  While you might be imagining a full scale overhaul of your home, there is a possibility that it would be in your best interests to scale it back a little bit.  You might need to focus on a few important rooms, like kitchens and bathrooms.

5 things to consider before remodeling | Home on the Range

Image via Home on the Range


You might need to focus only on updating furniture or finishes, because sometimes changing one thing can provide a whole new environment where the other things you thought needed to be changed immediately just don’t seem like such a big deal anymore.


Or, you actually really might need an overhaul, in which case you will need help laying out exactly how to do it.  The reason you need to ask yourself about your budget is this: planning is key in remodeling.  The last thing in the world you want to do is dive head first into 10 projects, then run out of money and live in a disaster area until you can continue towards your goal.


5.  Where should I start?

Here’s the simple answer: start by asking yourself all four of the previous questions.  Identify exactly what it is that you hope to get out of this endeavor, then identify the best way to get there.  Remember that we are here to help!  While I can’t speak for other designers, I know that at Home on the Range, all but one of our current projects are remodel focused, so we definitely know how to get the job done!  If you are interested in learning more, you can contact us through our website, or stop in to the showroom!  Good luck on your adventure!


For more remodeling inspiration, follow us on Pinterest!  You can also like us on Facebook to get daily inspiration sent straight to your wall.

About a year ago, we did a post on wallpaper and its re-appearance in the world of interior design.  When we created that post last September, we had only been seeing the briefest glimpses of the recurring trend, and wanted to share it with you because we knew it was beginning to make its comeback.  Since then, wallpaper has returned full force, which is wonderful because there are so many ways to use it!  We’re not dealing with that revolting 80’s floor to ceiling, wall to wall stuff anymore.  Now we are instead seeing wallpaper used to accent and compliment the existing colors, patterns and textures of a space.  You are going to be so surprised to see the different kinds of wallpapers that are available, and I’m so excited to tell you about them!


We’re going to split this post up into three different categories: color, texture, and pattern.  Each category can be interchanged or mixed depending on the look you are going for, but for the most part wallpapers fall into one of the three, so it’s the easiest way to talk about them!

Color: 

Color is most often mixed with either pattern or texture when dealing with wallpaper, but it’s still important for it to have its own category!  Color, above all else, will be the first and foremost thing that will either contribute to or detract from the feeling of your room.  When choosing color in a wallpaper, first ask yourself what you are trying to accomplish with the wallpaper.  Do you have a room with mostly neutral furniture pieces and flooring that you would like to add a bold splash of color to?  If yes, consider brighter tones when choosing your wallpaper.  Bright papers that have patterns in complimenting colors can really add character to an otherwise run of the mill space.

Tips on Choosing Wallpaper | Home on the Range

Image via Kravet


Tips for Choosing Wallpaper | Home on the Range

Image via Schumacher


On the other hand, if you already have a lot going on in the room, you can choose a milder color that reflects the feeling in the rest of the room without fighting with it.  In this case, it might be a good idea to consider papering an accent wall, rather than the entire room.

Pattern: 

Mostly all wallpapers come with either a pattern, a texture, or both.  Otherwise, why wouldn’t you just go ahead and paint the wall?  Patterned wallpaper is so much fun because it gives you a world of choices that normal old paint does not.  The right pattern on your wallpaper can instantly create the look that you are going for in a way that furniture and flooring just can’t do.  Here are some great examples of how a specific wallpaper pattern gives an instant style to a room:


Tips for Choosing Wallpaper | Home on the Range

Image via Decorpad

Tips for Choosing Wallpaper | Home on the Range

Image via Pinterest

Tips for Choosing Wallpaper | Home on the Range

Image via Schumacher

Tips for Choosing Wallpaper | Home on the Range

Image via Anthropologie


Texture:

Texture is one of the most fun things about the new wallpaper craze!  There are all sorts of textures available in wallpaper that give a new life to the trend.  Grasscloth is one type of texture that is rapidly gaining in popularity.  It adds a style that can be eclectic, homespun, or exotic, depending on what it is paired with.

Fabric options are another of my favorite wallpaper textures.  There are some beautiful wool textures, as well as denim and patterned velvet that I think would look (and feel) beautiful in the right bedroom.


Tips for Choosing Wallpaper | Home on the Range

Image via Schumacher

Tips for Choosing Wallpaper | Home on the Range

Image via Kravet


When choosing a wallpaper, it is important to remember the things that we talked about in this post, as well as a few other things too.

  • Make sure that you choose a wallpaper that you will love for years to come.  While bold patterns like chevron may be at the peak of popularity at the moment, think about how you feel about 80’s floral prints now, and realize that that is how you will feel about chevron in a couple of years.  Find something timeless.
  • Consider the size and layout of the area you are papering.  If you are wallpapering a cramped room, don’t cover all of the walls.  Choosing an accent wall will still convey your look without overwhelming anyone who steps into the room.
  • Get creative.  Paper things that you wouldn’t usually consider papering, like the ceiling!  But also remember to take into account the way it will feel when living it it- for instance, a dark paper on the ceiling will make the room feel dark and small, but a light paper on the ceiling with a subtle pattern will add more depth and character to the room!
  • Feel it out.  Choose the mix of color, texture and pattern that best work for you, remember to be creative, but don’t go crazy!

For more wallpaper ideas, and lots of other ideas too, follow us on Pinterest!  You can also like us on Facebook to stay up to date with everything that we are doing at Home on the Range, as well as get daily inspiration delivered right to your wall!

Kids rooms are my guilty pleasure- you can go a lot crazier with colors and decor in a kids room than you can anywhere else.  In a little girl’s room, it’s ok to feel like a princess, and in a little boy’s room there’s nothing wrong with being a pirate!  Here are 10 of the most fun, creative and special kids rooms that we have ever seen!


1.  The Pirate Room- Really?  A rope ladder, pirate ship, and under-the-sea mural?  Could this be more perfect?

10 Adorable Kids Rooms | Home on the Range

Image via Home Dsgn


2.  The Carnival Room- I love the soft and bright colors, and use of pattern in this room!  I also like how they used every day items to create all of the pieces here.

10 Adorable Kids Rooms | Home on the Range

Image via Pinterest


3.  The Eclectic Toddler Room:  Oh the colors in this room!  Also, everything looks so soft and comfortable, no sharp corners for banging your head here!

10 Adorable Kids Rooms | Home on the Range

Image via HGTV


4.  The Chalkboard Room: Where you never have to worry about them coloring on the walls!

10 Adorable Kids Rooms | Home on the Range

Image via Honest to Nod


5.  The Fireman Room:  How precious is this?  What little boy wouldn’t love to drive around and save kittens from fires in this room?

10 Adorable Kids Rooms | Home on the Range

Image via Pottery Barn Kids


6.  The Fairytale Room:  This room is so elegant but adorable, it would make any little girl feel like a princess!  Another great thing about this room is that it could be grown into, I know I would probably still love to live in this room!

10 Adorable Kids Rooms | Home on the Range

Image via Pinterest


7.  The Teepee Fort Room:  Oh wow, love the colors and patterns here!  They’re so fun and bright, any kid would love to wake up here!

10 Adorable Kids Rooms | Home on the Range

Image via The Handmade Home

8.  The Cowboy Hideaway Room: I think this might be my very favorite room of them all!  I love the corrugated roof, the wood posts, and the antlers!  This room makes rustic/western so much fun!

10 Adorable Kids Rooms | Home on the Range

Image via Pinterest


9.  The House in Paris Room: Can you just imagine the sleepovers that would happen here?  Too cute!

10 Adorable Kids Rooms | Home on the Range

Image via the Tumtum Tree


10.  The Colorful Kid Room:  The mix of styles in this room is fantastic… while your child might not appreciate that side of it, you can’t deny that they would love to sleep in a built in fort!

10 Adorable Kids Rooms | Home on the Range

Image via Handmade Charlotte


For more fun ideas, visit us on Pinterest!  You can also like us on Facebook to stay up to date on what we’re doing, and get great daily inspiration delivered straight to your wall!


A few weeks ago, we had a visit from our lovely friend Kay from Home Elements who came to show and tell us all about their new bedding collections!  And let me tell you, they are fantastic!  Today I wanted to share three of them with you, just in case you are looking for were new bedding!  Or even if you weren’t… maybe these will inspire you!

The Santa Fe Collection:

Home Elements Santa Fe Collection | Home on the Range

Image via Home Elements

This is my very favorite of the new collections, that’s why I put it first!  I love the pattern on the shams and duvet cover, it’s really beautiful and has a great tribal feel, while still remaining elegant and not too geometric or over the top western.  I also love the fabrics that are paired with it, the houndstooth adds another dimension that really contributes to the color and style, and the red coverlet and sham fabric compliments the patterned fabrics beautifully and helps to bring out the reds in both the houndstooth and the pattern pieces.  This bedding ensemble would be beautiful in any mountain home!


The Sun Valley Collection:

Home Elements Sun Valley Collection | Home on the Range

Image via Home Elements

I love love love the colors here!  Everything is so well matched in this collection, and it really makes me smile!  We often talk about how careful you have to be when incorporating the color blue into mountain homes, because it can so quickly become cold and icy feeling, but this ensemble warms up the blue in an incredible way.  I don’t think I could ever feel cold if I was wrapped up in this blanket!  For a while, we were seeing trends lean towards all greys, beiges and “greiges” , but now, thankfully, we are seeing the reemergence of color, and gosh are we excited about it!


The Santa Barbara Collection: 

The Santa Barbara Collection Home Elements | Home on the Range

Image via Home Elements

This collection is just so IN right now!  Between the greys with pops of yellow, the flowers and the chevron, this is about the most trendy bedding ensemble I’ve seen!  I love the use of color along with the grey and white.  This ensemble would be just perfect for a teenage girls room, or for a chic guest room!


If you like what you see here, would like to know more, or would like to talk to us about ordering bedding, please feel free to contact us any time!  We carry, and are able to custom order the entire Home Elements line!  If you would like to see more from Home Elements (who were recently featured in Mountain Living Magazine) you can visit them on their website, where you can take a look at all of their different collections!


While we can’t deny that summer is inching ever closer to its end (here in Steamboat we’ve had a sudden uptick of rain, cold nights and chilly mornings), it’s not time to pull out the winter clothes just yet!  There’s still time for one last hurrah, and what better way to do that than with an outdoor celebration?  And, where better to have an outdoor celebration than in  an outdoor living space with an outdoor kitchen?  We love the outside, and during the summertime in Steamboat there is nowhere else we’d rather be- I bet you feel the same about where you live!  Outdoor kitchens make outdoor living and entertaining a convenient and inviting option.

Most outdoor kitchens include some sort of cover/roof, a grill, counter space, and a sink… after that the possibilities are endless!  There are outdoor kitchens with ovens and stoves, kitchen islands, wet bars, fire pits, refrigerators, you name it!  Here are a few of our favorite outdoor kitchens of all shapes and sizes!


I love this kitchen because it mixes the indoors with the outdoors.  This space has all the features and coziness of an indoor kitchen, but is completely open on one side!  


This western outdoor kitchen is just adorable!  This would be a great “chuck wagon” style outdoor kitchen for a ranch or a Western Cowboy style home.

Outdoor Kitchens | Home on the Range

Image via Nora and Nick


Can you guess what I love about this one?  The built in fire pit of course!  Kebab and marshmallow roasting has never been easier!  

This one is great because it is detached from any other building, and the kitchen is a little area all its own.  How much fun would it be to enjoy breakfast out on that patio?

This more traditional looking outdoor kitchen is covered by a pergola, and I love the “kitcheny” stained glass hanging from the ceiling, as well as the creative wood storage below the counter.
Outdoor Kitchens | Home on the Range

Image via Pinterest


Here’s another pergola covered outdoor kitchen- this one has a more eclectic feel to it.  My favorite thing about this kitchen is the round butcher block table/island, and my second favorite thing is the tile backsplash!

The mix of styles in this outdoor kitchen are great!  The distressed painted wood combined with the stainless appliances and adobe wall give a really unique feel that is just perfect for summertime!
This much more contemporary outdoor kitchen is also beautiful, and fits right with the house it occupies.  The accentuated lines and stainless steel appliances make for a sharp looking kitchen, indoor or out!
I hope these lovely kitchens have inspired you to spend the rest of your summer days in the great outdoors!  We’ll have more posts coming up in the next couple of weeks that will include how to create your own outdoor living space, and tips on choosing and purchasing outdoor furniture.  For more fun outdoor living ideas, you can like us on Facebook or follow us on Pinterest!

Today we are excited to have a guest post for your viewing pleasure!  We would like to say a big thank you to Bryan from BuildDirect.com for contributing a super informative post on PAINTING your wood floor.  How unique and fun is that?  Painting a wood floor can either add a traditional, rustic, or eclectic look to your room, depending on how you do it.  If you have any questions along the way, or just want to find out more, you can visit BuildDirect.com for yourself for help, or for more great ideas!  So, without further ado, take it away Bryan!


Get a Fresh Look: How to Successfully Paint Wood Floors


If there’s one thing I love about wood floors, it’s gotta be versatility. Refinish ‘em, stain ‘em or paint ‘em, it’s absolutely up for you to decide. Yes, you read that correctly: paint ’em.


Painting floors has been practiced in North America since the late 1700s. Styles varied from monochromatic plains to parquet-like patterns, and popular colors included white, yellow, green and red. More than just for aesthetics, painting wood floors helped protect the wide plank wood floors that were popular at that time.

How to paint floors | Home on the Range

http://bohemianhellhole.typepad.com/


Following rapid development and industrialization advancements, painted wood floors took a backseat and gave way to carpets, clear coats and manufactured floor covering like linoleum and vinyl. However, artistry and creativity have once again made painted wood floors very popular.


Inexpensive, vibrant, and easy are just a few of the reasons that people have turned to painted wood floors for a quick update to make their rooms look fresh and brand new.


Here are the steps to follow to successfully paint wood floors:


Be sure to know what you’re doing and gather your materials.


Read, watch, ask and research how to do it, more so if you intend to do it yourself so you get familiar with the tools you need, how to use them and how much they’ll cost. More importantly, try to find out more about the wood floor you intend to paint so that you know which paint products will work best with them.

How to paint floors | Home on the Range

http://woodenfurniturehub.com/


Prepare and clean them up.


Preparing means removing all furnishing and fixtures together with any protective or decorative additions to the wood floors to be painted like mats and area rugs. If the wood floors have been some form of coat or finish, sand them off. You can have local contractors include it in the project or you might want to head out to Home Depot or other similar shop to rent out a machine for $50 or so a day. If you’re sanding it yourself, remember not to stay too long on a particular spot so that you don’t end up with uneven wood floors to paint. More importantly, remember to sand in the same direction as the grain.


Before you proceed with sanding, quickly but thoroughly inspect all the wood floorboards that you want to paint. This is the best time to do repairs or replacements of the floorboards if you want to make the project go as smoothly as possible.


Once you’re done sanding and there is nothing on the surface except bare wood, sweep or vacuum thoroughly to remove dust and wood residue. Finish off cleaning up by wiping the wood floors with a wet mop and a tack cloth.

How to paint floors | Home on the Range

http://www.paintmewhite.com/

Primp and prime


After cleaning up, apply primer to the wood floors before applying paint. Primers are important to the success of your painted wood floors so be sure to look for the appropriate priming product. Begin application at the edge of the room using a brush. Once you have covered all the edges, work inside from one end to the other. Let the primer dry according to manufacturer’s instructions.


Applying the first coat


Apply the first coat in the same manner you did the primer – brush it from the edges then work inward. In general, it is advised that you use oil-based paint for wood floors as they can appear more polished and, if you make mistakes, it’s easier to sand them off.

How to paint floors | Home on the Range

http://styleguide.homedepot.com/

Another neat trick in successfully painting wood floors is to use a natural brush in applying paint instead of rollers to create a smoother finish.


After the first coat has been applied, allow it to dry completely then lightly sand using 220-grit sandpaper. You can also use sand screens with a drywall pole sander then clean up with a damp dust mop and tack cloth.


Apply a second and third layer of paint. Keep in mind that each layer should be as thin and even as possible. The thicker the coats are, the easier they wear out.


Dried and cured

How to paint floors | Home on the Range

 http://roomsinteriordesign.blogspot.com/


Be sure to let the painted floors dry completely to ensure success. Let it dry before you start walking on it and once its dried, to be safe, allow 24 hours before bringing in the furniture. Be mindful of those stilettos too.


While drying can take 24 hours or less, complete curing of the paint can take up to four weeks. So be sure to consider that before dragging in the piano or anything.


Follow these steps and don’t be afraid to explore colors and patterns to create a fresh look for your wood floors.


About the Author:

Bryan Vu is a home improvement blogger and community outreach associate for BuildDirect, a leading flooring and building materials provider online.

Hello and welcome to our 4th installment of Ask the Designer!  Our questions this week are all across the board


Question 1:

Carole asks: What are some good ways to incorporate rustic decor into a non-rustic house?

Answer:  Great question Carole!  There are so so so many ways, and a lot of them depend on just how dedicated and ambitious you are!  Probably the very best way to incorporate rustic decor is through accessories.  Accessories are a great way to add any style you want to a home because they can contribute so much character, yet they are also temporary, so if or when you ever want to change them out it’s an easy process!

Rustic Accessories | Home on the Range

Image via Pinterest


Rustic Accessories | Home on the Range

Image via Pinterest


Light fixtures are another great way to add a rustic feel to a home without a massive overhaul.  Though you may not notice it consciously, lighting and light fixtures make one of the biggest impressions on a space.

Rustic Lighting | Home on the Range

Image via Pinterest

We actually did a blog post pretty recently called “5 Steps to a Rustic Room” that I would love to share with you in response to this question.  It features ideas big and small that you can implement to give instant “rusticness” to your non-rustic house.  You can pick and choose the ideas that work for you, and if you do make any of these changes, we would love to see pictures of them!


Question 2: 

Sandy asks: How do I organize a scrap book/bonus room, 25×24, help!

Answer: I love to organize things so much, so thank you for asking this question!  It gave me time to think about all of my favorite organization ideas, and now I’m excited to tell you about them!

My favorite tip for organization, especially in a small space, is to hide things in plain sight.  Although it sounds like you don’t have too small of a space, you can still use this tip to your advantage.  Rather than filling the room with large cabinets, shelving or closets, consider adding a knitting chair with a basket of yarn next to it, or a large craft table with drawers/storage underneath, like this one:

Craft room organization | Home on the Range

Image via Home on the Range

Another thing that looks great in crafty areas if you do want to keep everything perfectly organized and hidden, is to use unique furniture case goods/storage pieces rather than cheap plastic Wal Mart specials.  Think about how eclectic your craft room could look with a rug in the middle and mixed dressers, cabinets, armoires, etc around the wall?

Craft room organization | Home on the Range

Image via Pinterest

Use space above and below these pieces too by strategically placing baskets, buckets and crates that can be filled with supplies.

Craft room organization | Home on the Range

Image via Pinterest

Craft room organization | Home on the Range

Image via The Green Children


Remember that you are not trying to achieve a stark interior with a place for everything and everything in its place!  My favorite rooms are the ones with lots of character, and lots of STUFF!  The more you put in your room, especially if you love it, the more eclectic your space will be.  On that note though, remember to make it into a space that you want to work in.  If you hate seeing any clutter at all, you probably will want to go a more synchronized, matching route.

Craft room organization | Home on the Range

Image via Within a Quarter Inch

Craft room organization | Home on the Range

Image via Pinterest


Or if, like me, the more you see the more inspired you are, then a mix and match craft room will be just the ticket.


Question 3: 

Susan asks: I have old venetian blinds in my condo.  The windows are small, but I want to do something new.  Ideas?

Answer: When recommending window treatments, I always check these things first:

  •     Is there a view you need to frame? Is it high – like a mountain peak, or low – like a lake or valley.
  •     Do you need privacy – are there other buildings, people walking by etc.
  •    Is it for a bedroom?  Do you need black out or is light filtering fine?
  •    Do you want to be able to see out of the window, or can you block part of the view?
  •    Do you have enough depth in the window for inside mount treatments, or do they need to be mounted outside the window
  •    If outside the window, do you have room above the window, and to the sides for rods and stack


Once I have the answers to the above questions then we can look at options that will work for each scenario.


For a condo – or really any home, a Silhouette can be a good option.  They have ultimate flexibility of being up all the way, down and tilted open to block glare and provide some privacy, but still not feel closed in, and all the way closed for either room darkening capabilities or simply full privacy.  They come in a multitude of fabrics and colors and just recently unveiled a new cordless easy rise version.  I love that because I always hate to see all of the cords hanging down in the window from window shades!  http://www.hunterdouglas.com/our-products.jsp?so=tn#/P_1/


If you have a lot of windows and don’t want to go around raising and lowering shades all of the time, then drapes or curtains are a great way to go.   As long as you have the room to mount the hardware and stack the drapes back off of the window, then they provide the convenience of one or two easy tugs to cover up those windows!  They also provide opportunity to add pattern and color to a room.  There are so many wonderful drapery styles that we will leave that for another post!

How to choose window treatments | Home on the Range

Image via Houzz

How to choose window treatments | Home on the Range

Image via Houzz


If you need privacy for someone walking by outside then a bottom up, top down shade is often a great way to go.  That way you can leave it halfway up and get your privacy, but still see out the top.  I love to use this option in a powder room window.  Guests don’t want to raise or lower the shade when they go into the room but if you leave the shade closed all the time, then why have a window?  In this case, just leave it halfway up all the time so your guests don’t feel “exposed” and yet you still get light and some view. 

How to choose window treatments | Home on the Range

Image via Houzz


How to choose window treatments | Home on the Range

Image via Houzz


If you need some privacy, but don’t need to frame a view, then stained glass can be a fun option!

How to choose window treatments | Home on the Range

Image via Houzz


Sometimes all you need is to block the glare on a television or computer screen and yet preserve your gorgeous views!  This scenario calls for solar shades.  They give UV protection and block glare at the same time allowing you to see through them to the view!


Thanks so much to everyone who submitted questions for this month’s round of Ask the Designer!  You may have seen our recent blog and Facebook posts announcing that Ask the Designer was actually featured in last month’s issue of Mountain Living Magazine!  How exciting is that?  If you have a question about design, decorating, organizing, painting, flooring, you name it, you can submit it to us through the comments on this blog post, or on our Facebook page!  We look forward to hearing from you and answering your questions next month!

Because heaven knows, we could all use a more organized kitchen.  I really love some of these ideas, some are rustic, some are modern, and some are just plain practical!


These built in open shelves and plate holders make it easy to stay organized, but show off all of your beautiful china at the same time!

Kitchen Organization Ideas | Home on the Range

Image via Houzz


Oh my goodness, wouldn’t you just love to have your own coffee stand?  Not only does this add a great visual element to the room, but it also frees up space on the counter, as well as in cabinets where you would normally keep all of those coffee cups and sweeteners!

Kitchen Organization Ideas | Home on the Range

Image via For the Love of Coffee


This “spice drawer” idea is a perfect way to store all of those teeny bottles that just don’t seem to fit anywhere else!  Just make sure all of the lids stay on tight or you will be vacuuming cumin out of corners for days!

Kitchen Organization Ideas | Home on the Range

Image via Houzz


I don’t know about you, but I think this might be the cutest and most creative way to hold and organize kitchen utensils that has ever been invented!  Take the head of an old/antique rake, hang it on the wall, and bam!  Perfect utensil holder!

Kitchen Organization Ideas | Home on the Range

Image via Pinterest


Here’s another great storage idea- whether you you have a pantry, a cupboard, or just some shelves, these glass canisters are a fun way to keep your cooking supplies organized.

Kitchen Organization Ideas | Home on the Range

Image via The Farm Chicks


A basket or wooden crate is a great method for on-counter organization.  Large, low boxes or baskets allow for a lot of different items of different sizes and heights to be organized beautifully in one spot, without creating a vision of clutter.

Kitchen Organization Ideas | Home on the Range

Image via Nell Hill


Finally, another great way to organize your kitchen AND your life is this pretty list board.  You can make one of these with an old frame (with glass).  Line the area behind the glass with burlap, then use a dry erase marker to write lists and reminders on the glass- it makes for a lot prettier picture than millions of notes stuck on the refrigerator!

Kitchen Organization Ideas | Home on the Range

Image via Jill Ruth


For more great organization ideas, follow us on Pinterest, and stick around for our Ask the Designer posts, where we answer reader questions about interior design, organization and more!